Body
This guide applies to classrooms in Lark 102 & 206
IMPORTANT NOTE
LECTERN EQUIPMENT: When using Zoom, you must use the Mac Mini computer in the lectern. This is because the room's camera and microphones are hardwired to it. Do not use Apple TV / AirPlay.
AUDIO/VIDEO: You must verify the microphone, speaker, and camera settings in Zoom's settings before each meeting.
FILE/PRESENTATION SHARING: To share files/presentation during the meeting, you have a few options:
-
Access them from the Podium computer from Google Workspace or Cloud storage.
-
If files are stored on your laptop, follow these instructions to use screen sharing from your laptop. Note you must still run the meeting from the lectern computer. Follow the JOINING IN THE SAME ROOM instructions below.
JOINING IN THE SAME ROOM: When a Zoom session is running in a classroom, multiple participants within the same physical space (classroom) may need to join the meeting
- Designate only one Zoom participant in the physical classroom to use audio. This is most often the instructor / podium computer as previously described.
- Everyone else in the classroom should follow these steps:
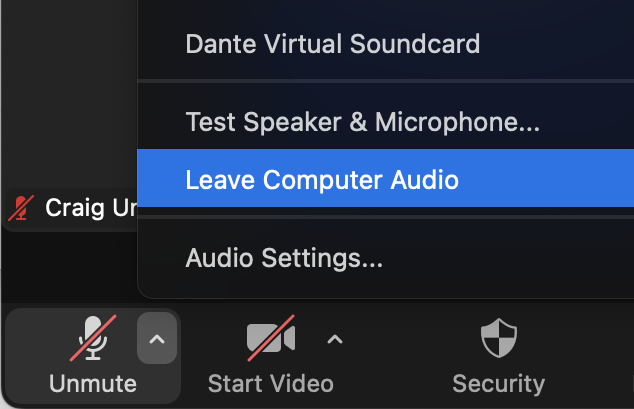
- Click on the up-arrow in the Mute/Unmute icon in the lower left corner.
- Click on “Leave Computer Audio”
- Note this does not apply to REMOTE participants. This only applies to IN-ROOM people.
NOTE: Simply Muting your microphone will not fix audio problems; you must “Leave Computer Audio” to eliminate potential problems
Until this step is done, you may experience echo / feedback noises.

ZOOM FROM PODIUM COMPUTER
- Select "Podium Computer" from the TouchPanel

- Log In to the Podium Computer with your Moravian credentials
- Launch the ZOOM App and log in with your credentials. Choose SSO (single sign-on).
- If prompted for company name, type "moravian"
- Enter your Moravian username and password when prompted
- If prompted to "Allow" camera or microphone access, Select "Allow"
- Start your Zoom Meeting
- Select "Meetings" from the top menu bar to see all of your scheduled Meetings
- ALWAYS test your AUDIO settings before your meeting starts.
- Click the up arrow next to the "Mute/Audio" button on your Zoom
- Select Test Speaker and Microphone and follow the prompts
-


- The Microphone and Speaker settings in the Lark rooms should use the following:
MICROPHONE = Dante USB I/O Module
SPEAKER = Crestron
- Check your Video Settings
- There is a PTZ (pan-tilt-zoom)-capable camera in the Lark classrooms.
- See below for additional controls of the PTZ camera via the touchpanel.
- NOTE: The document camera is not used as a camera in Zoom. It can only be shown on the projector in the classroom.
COMMON PROBLEMS & SOLUTIONS
"I can't hear anyone."
- Be sure you've selected the proper "Speaker" in Zoom
- Make sure you've pressed "Send To Projector" or "Send Audio Only" for the podium Mac.
- Adjust the volume on the touch panel as needed.
“The people on Zoom can't hear us.”
- Be sure you've selected the proper "Microphone" in Zoom.
- Be sure the mics are not muted on the touchpanel, and volume turned up (you should be able to hear the lapel and gooseneck mics through the ceiling speakers).
“The camera image is upside down or flipped backward”
- Check Video Settings and see if "Mirror My Video" is checked. If so, uncheck the box.
TOUCHPANEL INSTRUCTIONS

BASIC INSTRUCTIONS:
- SOURCE SELECTION: Touch the source you wish to hear & view. The projector/display, lectern monitor, and room speakers follow this selection. The currently selected source is highlighted with a yellow square.
- VOLUME CONTROLS: Up/down arrows on the lower right face of the touchpanel.
- POWER: Turn the display/projector on and off with the large green & red buttons on the right side.
- VIDEO MUTE: Blanks the room’s projector/display without turning it off. Press again to unblank the screen.
- STATUS INDICATORS: Information about power, video signal, and selected source are shown in the lower left corner.
ADDITIONAL INSTRUCTIONS:
- MAIN MENU: When selecting Blu-ray or Camera (where available), expanded controls for that source will appear. To return to the main source selection menu, press the yellow “RETURN TO MAIN MENU” button in the upper right corner. You may also press the “Home” icon.
- BLU-RAY CONTROLS: All required Blu-ray control functions are available on the touchpanel. The Blu-ray player itself is located in the lectern.

SIDE BUTTONS:
From Top to Bottom,
- Power Off
- Home / Main Menu
- Lights/Screen/Shades (where available)
- Volume Up
- Volume Down

CAMERA CONTROLS:
Some rooms are equipped with controllable cameras for Zoom video conferencing purposes. These cameras are connected to the lectern computer only.
Up/Down/Left/Right, Zoom +/-: adjusts pan, tilt, and zoom of the camera lens.
Preset buttons: Press to recall a camera position, or press and hold for 5 seconds to save the current camera position to that preset button.

If you experience any technical difficulties, please do not hesitate to contact the IT Help Desk at 610-861-1500.